
Kitchen & Pantry Organization
Real-Life Tips for a Clutter-Free, Functional Kitchen and Pantry

If your kitchen counters are cluttered, your pantry feels like a black hole, or you waste time every night searching for ingredients you swear you bought last week – you’re in the right place!
Kitchen and pantry organization isn’t just about matching containers and rainbow-labeled bins. It’s about creating a system that works for your lifestyle and helps you move through your day with less stress and more ease.
As a professional home organizer based in Portland, Oregon, I’ve helped my clients create clutter-free solutions both in-person and virtually. Let’s break down the practical steps, the most common mistakes, and a few myths that might be keeping your kitchen more chaotic than it needs to be.
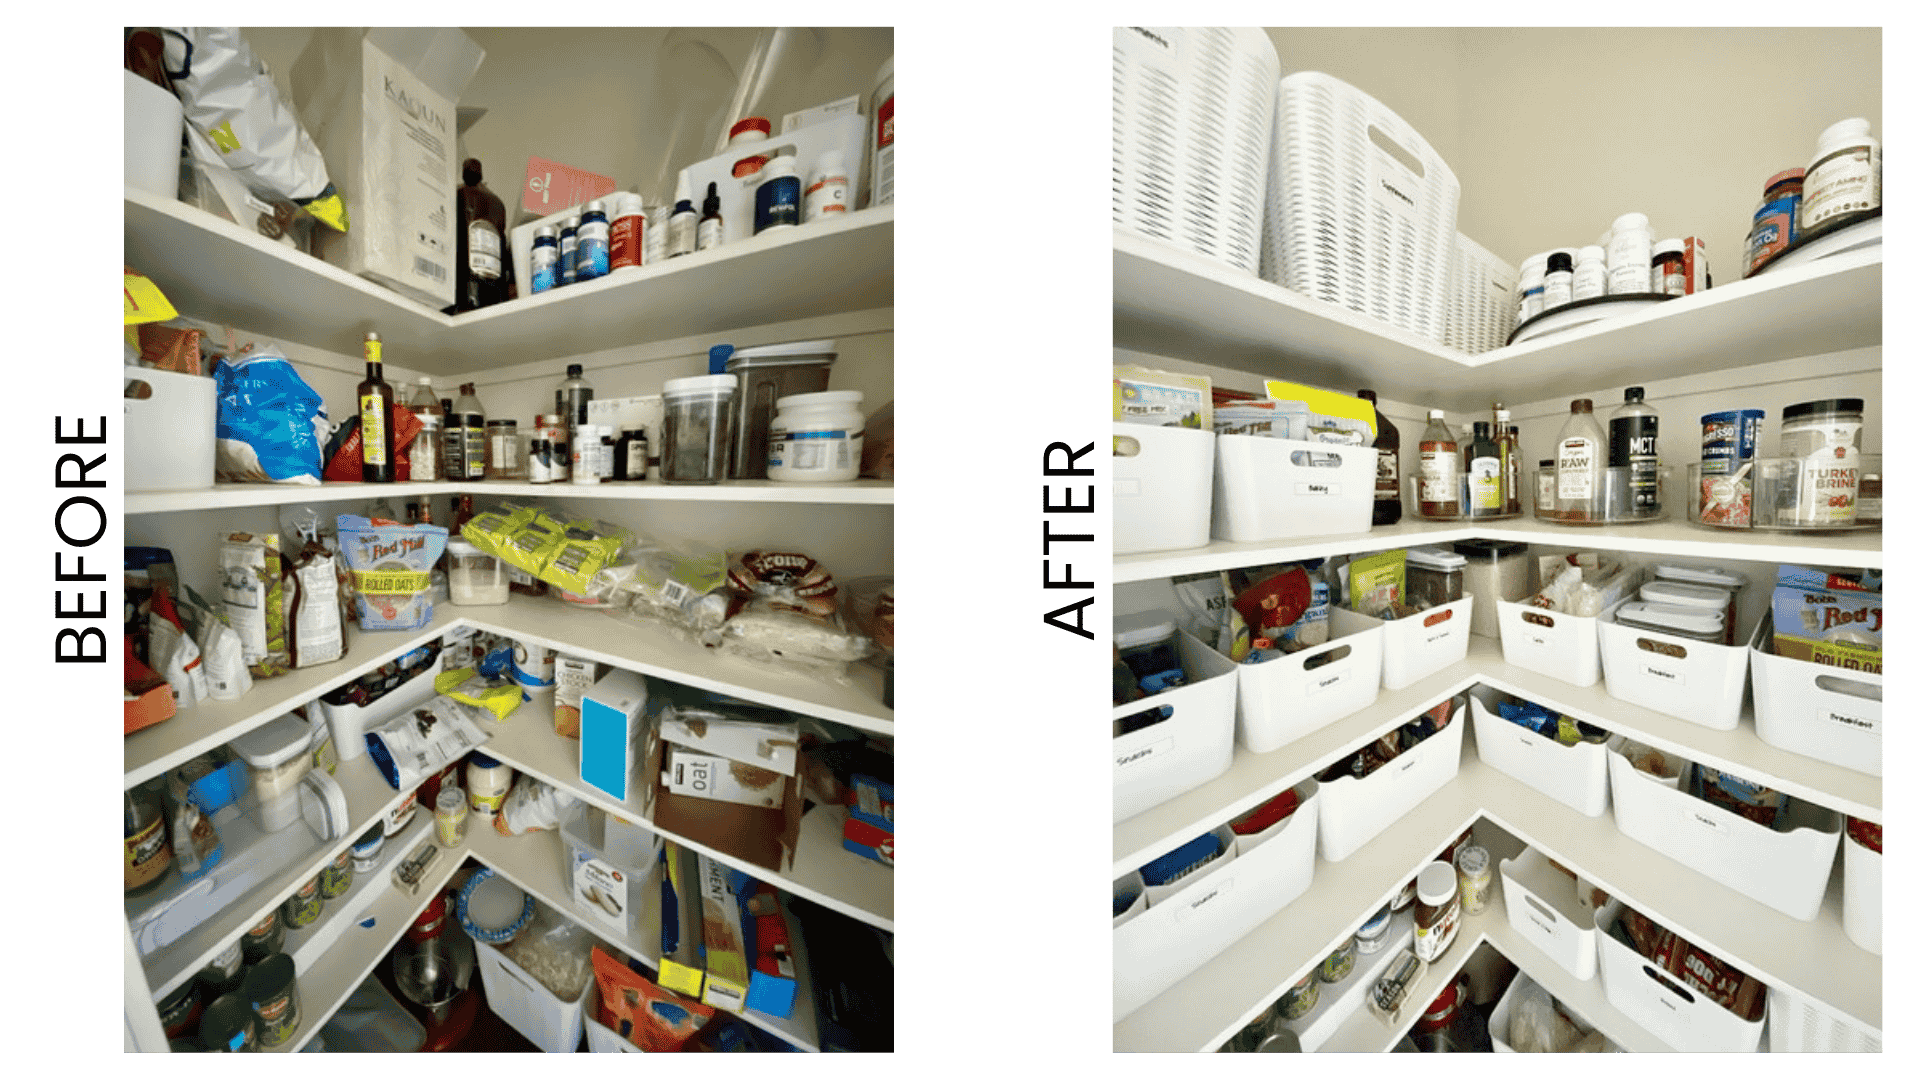
Step 1: Empty, Evaluate, and Edit
Before you can organize anything, you need to see what you’re working with. Start by taking everything out of one cupboard or drawer at a time, grouping similar items together i.e. - glasses, utensils, food storage containers, etc. Declutter what you no longer use or need. Then, move on to the next drawer or cupboard, doing one at a time. Once you have finished your drawers and cupboards apply the same process to your pantry. Pull everything out one shelf at a time, grouping similar items together, then declutter. Next repeat this process for your fridge and freezer. It can feel a little overwhelming at first when you start to pull everything out… but trust the process!
Check those expiration dates: Toss anything expired, stale, or long-forgotten.
Group like with like: All spices together, all snacks, all baking supplies, etc.
Declutter, declutter, declutter: Do you really need four half-used bottles of balsamic vinegar? Consolidate items if you can! Unwanted items that are unopened and still have some life in them could go to a local food pantry or other community organization!
This step is the most time-consuming — but the most important! Decluttering first ensures you're only organizing what you actually use.
Pro-tip: Take a before photo to see how incredible your progress will be!

Step 2: Assign Zones That Reflect Real Life
We all love a good Pinterest-worthy panty… But instead of organizing by aesthetics, let’s think about how your household uses the kitchen. Consider how much storage you have, what meal-time tasks take up the most space, or if certain items need to be placed out of reach (it’s ok if you have a secret snack stash you don’t want the kids to find, I’m not judging!)
Here are some examples of what those zones could look like:
Breakfast zone: Cereals, oatmeal, coffee pods, toaster
Meal prep zone: Oils, spices, cutting boards, knives
Snack zone: Kid-friendly bins at eye level, grab-and-go items
Baking zone: Flours, sugars, baking soda, muffin tins.
You want the layout of your kitchen and pantry to support your habits, not fight them! Group items by purpose and proximity.
Step 3: Use Clear, Consistent Storage (But Don’t Buy Before You Organize)
The biggest organizing myth? Thinking you need to buy all the bins first. Don’t fall for it. I know it’s fun to want to splurge on pretty containers right up front! But always declutter and group your items before buying containers so you know what you need (and what fits!).

Pro Tip: Measure your shelves, drawers, and cabinets to ensure that the storage items you purchase will fit in your space.
Here are a few go-to storage ideas:
Clear bins for snacks, pouches, and small items – I love this set of bins for smaller snacks, this coffee pod container, and this soda can organizer for easy access!
Lazy Susans for oils, sauces, and jars. Such a great way to save space – check out this open option or even this one with compartments for more organization.
Tiered shelves for canned goods or spices. These don't just look pretty, they make finding your favorites so simple! I love this set that comes with the rack, spice jars and labels for a beautiful, cohesive design – and this is a great option for cans and bottles.
Airtight containers for dry goods like flour, pasta, and rice (bonus: they keep things fresher longer!) My clients love this option for easy pantry storage and this set with pretty lids for a more aesthetic styling!
Drawer dividers for utensils and cooking tools. I like this set for its compartment customization and this set for its simple and functional design.
Miscellaneous options that I love? This sandwich bag organizing system, a shelf for organizing your water bottles, and this super handy food storage lid organizer (because we all know how annoying they are to try and keep organized!).
Use labels to reduce the mental load—especially for shared spaces where everyone needs to find things easily.
(And you can shop all of my favorite kitchen and pantry organizing supplies here!)
Step 4: Create a Maintenance Routine
Organization isn’t a one-and-done job. Just like laundry and dishes, it needs small, consistent effort to keep it running smoothly.
Do a weekly reset: toss expired food, take stock of groceries.
Wipe down shelves and reorganize stray items.
Create a running grocery list based on what’s missing.
A good system will let you know when something is out of place or low in stock.

Common Mistakes (And How to Avoid Them)
Over-organizing (a.k.a. perfectionism) → Systems should be simple and sustainable, not Pinterest-perfect. If it takes too much effort to maintain, it won’t last.
Not involving the family → If you’re the only one who knows the system, it’s going to fall apart fast. Get everyone on board by labeling clearly and keeping systems intuitive. The kids will also appreciate knowing where their favorite foods are!
Ignoring vertical space → Add risers, hooks, or over-the-door organizers to make the most of your storage, especially if you have limited storage space.
Stashing random stuff in the junk drawer → Ah, the infamous junk drawer. It’s easy to just let it be a catch-all. Instead, try to designate a small container inside that drawer for odds and ends… but be careful to not let it get out of control!
Managing Bulk Buys Like a Pro
Buying in bulk from stores like Sam’s Club or Costco can be a smart way to save money and reduce shopping trips – but only if you have a system to store and access those items.
First, take stock of what you actually use consistently in large quantities (think paper towels, canned goods, pasta, snacks) and avoid impulse buys that just take up space. Use airtight containers or clear bins to decant oversized packaging and make everything more accessible. This is a great way to store bulk overflow in a designated “backstock zone” — ideally a shelf or cabinet that’s separate from your everyday pantry. This way, your kitchen stays functional, and you're not digging past a 24-pack of canned tomato sauce every time you need to find the salt.
Want a Professional Touch?
Feeling overwhelmed by the idea of organizing your kitchen or pantry? I can help! Whether you need hands-on help in your home or want a virtual organization session, I’ll meet you where you are and help you build a system that actually works.
Book a consultation today and let’s create calm in the heart of your home!